I can’t stress enough the importance of backing up your data. A hardware malfunction could wipe out your data in the blink of an eye. A ransomware attack could encrypt all of your data and hold it hostage. Backing up your data should be a top priority and it should be simple. The reality, however, is that it often isn’t as easy as you would think.
CloudBerry reached out and asked me to take a look at their solution for cloud backup. The CloudBerry Backup approach is unique. Why? Well, there are software tools that backup data locally—like to an external USB hard drive, and there are cloud-based backup services like Carbonite or Backblaze. CloudBerry Backup, however, is a software application that can facilitate backing up your data locally, to the cloud, or both.
I wrote back in 2013 about serious issues we were having at the time trying to back up a significant amount of data to Carbonite. Until recently, we’ve been happy customers of Crashplan, but Code42 pulled the plug on the home service in August, so we are actually in the market for a new backup solution.
Form
There are a number of versions of the CloudBerry Backup software: Desktop Free, Desktop Pro, Server, MS SQL, MS Exchange, and Ultimate. The software is available for Windows 7 and higher, Windows Server, macOS, and Linux. My goal is to replace Crashplan with a viable solution for backing up data from a Windows 10 desktop in my home to the cloud, so I chose CloudBerry Backup Desktop Pro for Windows.
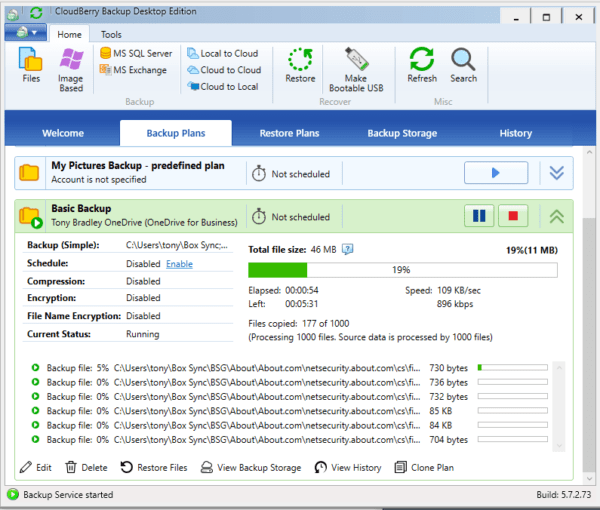
The application looks a lot like a web page – but with a ribbon toolbar like the ones in Microsoft Office across the top. There are tabs across the top of the main window to select from Welcome, Backup Plans, Restore Plans, Backup Storage, and History.
It’s important to note—which CloudBerry does repeatedly—that CloudBerry is NOT a cloud storage provider and that the storage is completely separate from the CloudBerry Backup software.
Function
The Backup Plans tab of the software comes with some pre-defined plans like backing up your internet bookmarks, backing up documents, and backing up pictures. In the ribbon bar menu at the top, though, you can select Local to Cloud, Cloud to Cloud, or Cloud to Local to start the process of creating your own custom backup plan.
You can backup to local or NAS (network attached storage), to the cloud, or to both. You can choose to backup data to a NAS and then to the cloud—creating redundant local and offsite copies of the backup data in one process.
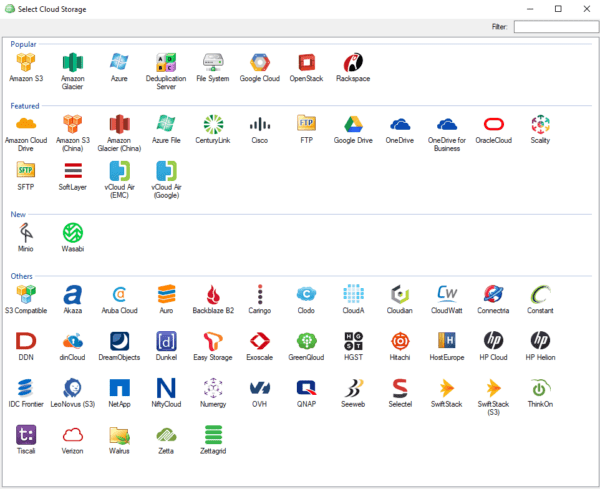
The array of cloud services you can backup to is a little mind blowing. You can choose just about anything, from household names like Amazon S3, Microsoft Azure, Rackspace and OneDrive to obscure cloud services like GreenQloud or Seeweb. Interestingly, there are some well-known cloud storage providers missing from the list like Box and Dropbox.
Once you select the destination for your backup, you then configure the backup mode. There are four to choose from: Advanced, Simple, Custom, and Archive. Advanced performs block level backup and encrypts the data. It is faster and more secure, but you can’t access the data directly with a file manager. Simple loses the encryption and block level backup in favor of the ability to access the data directly if necessary. Custom and Archive address unique scenarios and give you the flexibility to backup the way that works best for you.
CloudBerry Backup gives you an insane amount of control and granular options to configure the backup. The advanced filters allow you to specify file types to back up, or file types to exclude. You can choose whether or not to backup empty folders, and/or designate folders that should be skipped. You can designate that files older than a specified timeframe be backed up, or only files newer than a specific timeframe. You can choose to exclude files over a specified file size, or ignore system and hidden files.
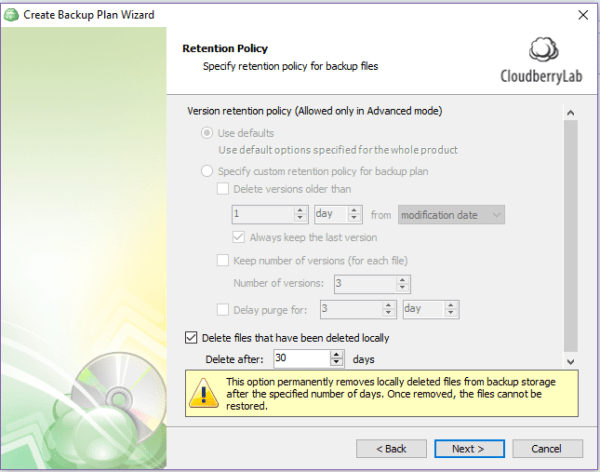
You can run your backups manually, or schedule them to run at designated days and times. You can also configure whether or not files that are deleted locally should also be deleted from the backup data, and how many days to retain the backup data after it’s been deleted locally.
My Experience
The flexibility is a little bit of a double-edged sword because having so many options can make it seem daunting to configure and use. To CloudBerry’s credit, I never felt overwhelmed despite the dizzying array of configuration options.
I wasn’t interested in just backing up documents, or bookmarks, or pictures, so the pre-defined backup plans didn’t work for me. I need to conduct a full backup of hundreds of gigabytes of photos and videos, plus all of my music and movies, plus all of my documents. In total, it’s about 850GB of data.
I have an ioSafe NAS that is disaster proof – it’s essentially impervious to flooding or fire so the data should survive most disasters. I set up a backup plan that backs up all of my data to the ioSafe unit, and also to OneDrive for Business.
I ran into some confusion about storage limits for the backup. The specifications cite a 1TB limit for CloudBerry Backup Desktop Pro edition. The FAQ states that this is their way of making the product affordable for users with lower storage requirements. The confusing part to me is that CloudBerry isn’t providing the storage capacity, it’s just acting as a facilitator to help move the data from my local storage to a backup destination.
I have 12TB of capacity on my ioSafe, and I don’t see why CloudBerry would limit me to only using 1TB of it. As far as I can tell, there is no reason CloudBerry should care how much data I store. As it turns out, though, my OneDrive for Business capacity is also 1TB, so that is my limit regardless of CloudBerry.
The backup itself ran fairly smoothly. The speed of your backup will vary depending on the amount of data you’re backing up, the power of your PC, the speed of your local network, the bandwidth of your internet connection, and the speed and processing power of the destination servers. I have a very fast internet connection with upload speeds in the 800Mbps-plus range, but my backup average somewhere closer to 60Mbps or 70Mbps due to constraints on the OneDrive end of things.
It took a few days to backup the full 850GB. The up side, though, is that keeping the data backed up will require far less time. CloudBerry doesn’t back up all of the data every time. It identifies the files that have been added or modified since the last complete backup and only does those. With block level backups, CloudBerry goes a step farther—rather than backing up the entire file every time it can backup just the modified portion of a file.
I only have two complaints, really. First, there are options and features present in the software that are not actually available in this version. There are icons at the top for Image-Based, MS SQL Server, MS Exchange, and to Make Bootable USB—none of which actually do anything in the Desktop Pro version. I don’t think it would be that hard to just remove those from this version so they aren’t there to confuse users or taunt them with capabilities they can’t use.
That brings me to my second complaint. In my opinion, the Desktop Pro version should absolutely be able to do an image-based backup of the Windows desktop and/or create a bootable USB image. Those are very handy and very useful features to have in a backup utility, and I don’t think a consumer should have to spend four times as much money to buy the Server edition of CloudBerry Backup to gain access to them.
The Verdict
Short version: You need to buy this software.
My minor complaints aside, CloudBerry Backup Desktop Pro frees you from being tethered to a specific cloud platform or backup service provider, and gives you insane flexibility to backup where, when and how you choose. It will be $30 well spent. When you get compromised by the next ransomware attack, you will thank me…and CloudBerry.
If you have less than 200GB of data to back up and you don’t need encryption (although I would highly recommend the encryption), you can use CloudBerry Backup Desktop Free edition. I also want to point out that the CloudBerry Backup software is available for free to perform restores of backup data.


Comments are closed.