30 Days with Surface Pro: Day 8
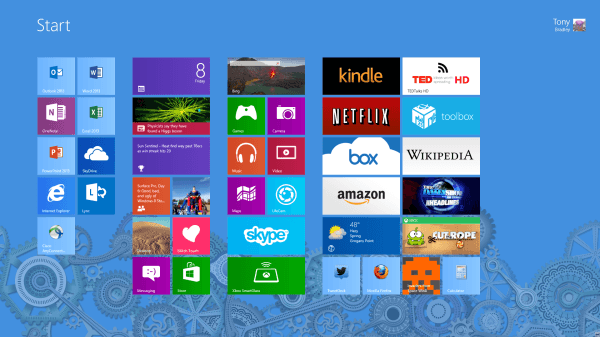
For today’s 30 Days with Surface Pro adventure, I’m going to dive into the Start screen–the Windows 8 Modern / Metro interface that Windows 8 boots into by default. I need to customize it to look the way I want it to look.
First things first, I want to configure the colors, background, and lock screen image. I hovered over the right side of the screen (or swipe from the right if I was using the touch display instead of a mouse) to open the Charms bar, and tapped on Settings. The settings for customizing the Start screen aren’t one of the few displayed by default, so I tapped on the Change PC Settings link at the bottom. On the list that appears, Personalize is the top option.
When I tap on Personalize, the right pane gives me the settings to work with. I started with the Lock Screen–the image displayed when the PC is locked. I could have used a personal photo, but for the sake of expedience I just selected one of the options provided by Windows 8. The Lock Screen settings also let me choose which apps should continue to run in the background even when the PC is locked, and display information on the Lock Screen. This is a cool feature because it allows me to still see incoming email messages, calendar events, and other information without having to log in to the PC again. Of course, it also allows anyone else walking by, or someone who steals the Surface Pro to see that information as well without logging in, so it’s best to choose wisely what information should be displayed there.

Next I tapped on Start Screen at the top. Here, I was able to choose the overall color scheme for the Start Screen, and choose from a variety of patterns that are displayed as a sort of subdued wallpaper. Choosing a solid color with no subdued background is also an option. Another cool thing is that–because I am logged in using a Microsoft ID–the changes I make to the Personalization settings here will be immediately and automatically reflected on other Windows 8 PCs I log into.
There seem to be two kinds of people when it comes to Windows: those who have so many icons and shortcuts on their desktop that you can’t even see the wallpaper behind them, and those who have virtually nothing on the desktop. I tend to be the latter. I abhor programs that automatically place icons on my desktop–and I have a particular loathing for those that not only place a shortcut to the main program, but also include a variety of utilities and configuration tools that I will never use, and probably wouldn’t even realize existed if the icons weren’t littering my desktop.
The same thing happens in Windows 8. For example, when I installed the software for my HP Laserjet M1217nfw printer, I ended up with eight separate tiles on the Windows 8 Start screen. I had FAX Setup, HP ePrint, Scan To, Send FAX, Wireless Configuration, and more. The only one I might occasionally get some use out of is Scan To, and I can go into the Apps and find it when I need it–I don’t need it pinned on the Start screen.
So, I had to do some housecleaning. You can right-click on a tile to access settings for it. If you’re using the touchscreen display of the Surface Pro it’s a little trickier. You have to tap and hold, and then drag the tile down slightly–but not enough that Windows 8 thinks you’re trying to drag it to a new location. It takes some getting used to.
Once the settings were open, I had the option of uninstalling the app entirely, unpinning it from the Start screen, or changing the size of the tile. For Live tiles–the tiles that actively display new data–there is also an option to turn the live updates on or off. For situations like mine with all of the HP apps, you can also select multiple tiles to work with, but when you do you’re only options are to unpin them all from the Start screen, or to erase the selections and start over.
After removing unwanted tiles, dragging tiles here and there to organize them how I like, and changing the size of some of the tiles, I got the Windows 8 Start screen set up how I want it. If I need to access any of the many apps that aren’t pinned on the Start screen, it’s simple to right-click on the Start screen or swipe down from the top to access all of the other Apps on the Surface Pro.
Day 7: Installing software
Day 9: A closer look at the default apps

Comments are closed.